Thursday, November 16, 2017

Craft Show Goodie #3

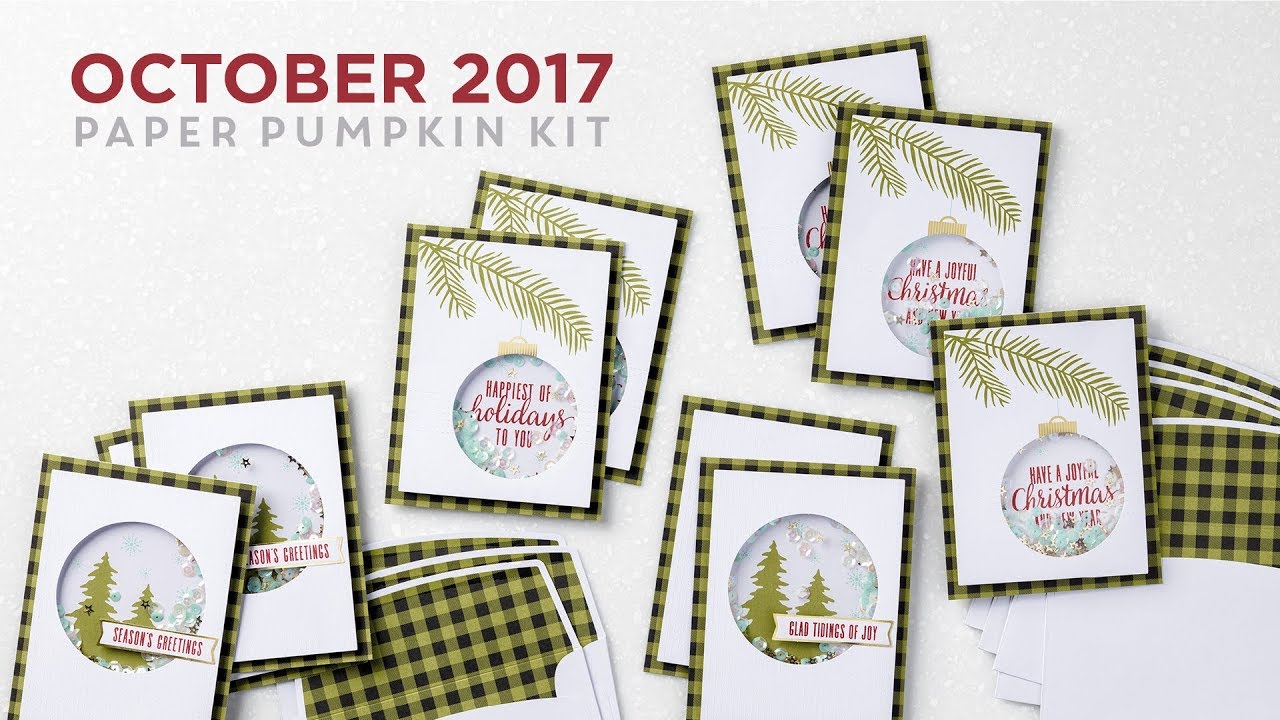
I'm a big fan of the Paper Pumpkin kit by Stampin Up. I really love the all-inclusive kit but my favorite thing is to create an alternative. This wine tag was using the stamp set from the October 2017 paper Pumpkin kit. I know you would love to use this tag to brighten someone's holiday season.


Images©Stampin' Up


Supplies:
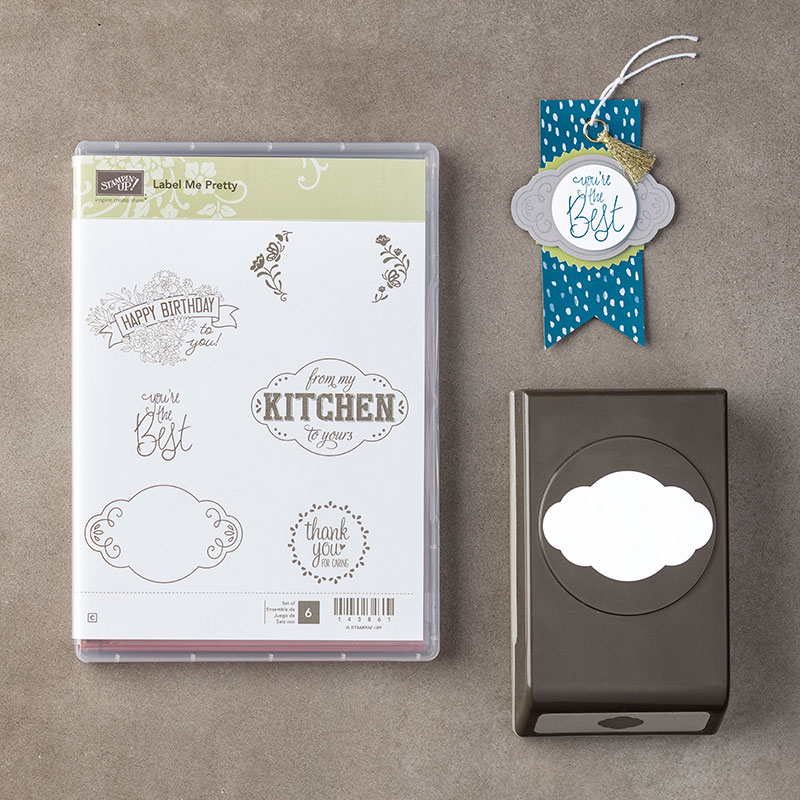
October 2017 Paper Pumpkin Stamp Set
Old Olive Cardstock 100702
Whisper White Cardstock 100730
Old Olive Ink Pad 126953
Merry Little Christmas Designer Series Paper (DSP) 144621
Stitched Shaped Thinlet Dies 145372
Layering Circles Thinlet Dies 141705
Bigshot Die Cutting Machine 143263
Gold Ribbon 134583
Gold Metallic Enamel Shapes 141678
Fast Fuse 129026
Dimensionals 104430

Measurements and Instructions:
Cut Old Olive cardstock 21/2" x 8", Score and fold at 2 1/4" from the top.
Cut Merry Little Christmas DSP to 2 1/4" x 4 3/4".
Cut Whisper White cardstock 2 3/8" x 4 7/8".
Layer DSP onto whisper white cardstock using fast fuse.

Bigshot and Stamping:
Die cut 2 3/4" x 1 13/16" Oval Stitched Shape
Die cut a 1 3/8" circle in top half of Old olive wine tag.
*To give your wine tag that extra pizazz do some tone on tone stamping.*
Stamp sentiment on oval shape using Pining for Plaid Stamp set.
*This technique is optional*

Assemble tag per the picture.
Add gold metallic enamel shape and gold ribbon for that extra pop.


Follow me on Facebook and Instagram!


Thank you for visiting my blog!
A blessed and happy crafter!

Happy crafting to you!

Monday, November 13, 2017

The Stamparatus by Stampin Up "A New Way of Stamping"


It’s big news when something breaks the mold and changes everything. The Stamparatus will change the way you stamp, and before long, you’ll wonder how you crafted without it!

Why do YOU need one? You’ll fall in love with stamping all over again when you learn everything you can do with it!
  • Make multiples with ease
  • Consistently stamp crisp, clean images
  • If you want a darker impression, apply more ink and restamp—no need to start over
  • Make fewer mistakes, saving time and money
  • Easily create 2-step, 3-step, and 4-step stamped images using reversible plates
  • Develop new and specialized stamping techniques with adjustable stamping plates and precision
  • placement.

Checkout  the video: Stamparatus - 5 Things


The global launch will feature three pre-order reservation windows. 
For each window, please note the following

Reservation  Windows     
November 16-30, 2017 
December 5-30, 2017
January 15-30, 2018

Available to Ship
Approx. February 1, 2018
Approx. March 19, 2018
Approx. april 15, 2018

Click here to Reserve your Stamparatus on November 16th, if you don't have an online account with Stampin Up  you will need to create this first.

Click here for instructions to complete your reservation.

Here's the information you need to create an account:
Charmane Hopkins
Demo ID 2158714
Houston, TX 77067

Thank you for visiting my blog!
A blessed and happy crafter!

Happy crafting to you!


Craft Show Goodies #2

Last year in October Stampin up had a Designer Series Paper promotion and I purchase several packets. When the new annual catalog was launched this year  most of the designer paper was put on the retired products list. I really love the colors in this paper so I decided to use it for these cute hand sanitizer holders. These holders make great gifts for teachers, co-workers or stocking stuffers.

The idea for this project came from Amy Bailey Waltrip but I changed it up to incorporate one of the Paper Pumpkin stamp sets.

Hand Sanitizer Holders
Images©Stampin' Up
Lable  Me Pretty Bundle
Label Me Pretty Clear-Mount Bundle
Images©Stampin' Up

Stampin Up' Supplies:
Label Me Pretty Bundle (save 10% on Bundle) - 145305
Pumpkin Pie Ink Pad - 126945
Tempting Turquoise Ink Pad - 126952
Melon Mambo Ink Pad - 126948
Emerald Envy Ink Pad - 141396
Whisper White Cardstock - 100730
Fast Fuse Adhesive - 129026
Tear & Tape Adhesive - 138995
Bone Folder - 102300
Stampin Up Paper Trimmer - 126889
Scalloped Tag Topper Punch - 133324

Retired Items:
Festive Birthday Designer Series Paper (DSP)
Melon Mambo Ribbon
Emerald Envy Ribbon

Other Items:
Hand Sanitizer ( Dollar Tree)


Instructions:
Cut DSP 2' x 11", Score@ 5" & 6"
Punch both ends with the Scalloped Tag Topper Punch.
Stamp image and sentiment on whisper white card stock using the Label me pretty stamp set. Once all the stamping is completed  punch out label using the Pretty Label Punch.

Attach label to holder using the tear and tape adhesive. Insert hand sanitizer and close top with ribbon. *Tip I put glue dots on hand sanitizer to hold it in place*.

I love these vibrant colors but this DSP is retired, If you would like create this project go to my online store and check out the new designer series paper. I would love to see what you create.

Craft Show Goodie  #3 will be posted in the next couple of days

If you would like to learn how to make this and other cute projects join my team
I promise you hours of unlimted crafting fun. 

Event details is listed on my calendar. 

Follow me on Facebook and Instagram!
  
Thank you for visiting my blog!
A blessed and happy crafter!
  

Happy crafting to you!

Thursday, November 9, 2017

Craft Show Goodies #1 featuring "Stampin' Up Products"

On December 2, 2017, I will be a vendor at the St. Rose of Lima Holiday Market. Last year was my very first time and it was awesome. Over the next couple of weeks I will be sharing some of the goodies I've created .  The first item is the cute little post-it note holder with pen. This is the perfect gift for a teacher, co-worker or  even a secret Santa. 

Post Note Holders with pen.


Images©Stampin' Up

The inspiration for this cute little Post-it Note holder came from Lisa Ann Bernard of Queen B Creations. I cased her project but featured the Ribbon of Courage Bundle from Stampin' Up! This bundle is my favorite from the annual catalog.

Images©Stampin' Up


Stampin Up Supplies:
Ribbon of Courage Bundle(save 10% on Bundle) -145342
Whisper White Cardstock scrap - 100730
Melon Mambo Cardstock - 115320
Melon Mambo Ink Pad - 126948
Big Shot Die-cutting Machine - 113475
Stampin Up Paper Trimmer - 126889
Fast Fuse Adhesive - 129026
Tear &Tape Adhesive - 138995
Bone Folder - 102300
Clear Block: D - 118485
Clear Block: C - 118486

Other Supplies:
Post-it Note (Dollar Tree)
Velcro Dots ( Hobby Lobby)

Cutting and Stamping:
Using the paper trimmer cut the  melon mambo cardstock 8.5" x 3.5" 
score@ 1.5", 2', 5" &5.5"
Stamp ribbon image on whisper white scrap and die cut ribbon using the Support Ribbon Framelit dies.  Choose a sentiment from the Ribbon of Courage stamp set and stamp in on the inside as shown in the picture. I chose to do the tone on tone stamping technique. 

Assemble:
Take your bone folder and crease the score marks. Attach the post-it note to the inside of holder using the tear and tape adhesive. Close holder and attach ribbon die cut to the top as shown in the picture. To make sure the velcro dots are correctly aligned remove backing and attach to back of top flap. Remove back from bottom of velcro dot and close holder. This technique will attach the velcro dots to the holder correctly. Woohoo your holder is complete. 


Craft Show Goodie  #2 will be posted in the next couple of days.

If you would like to learn how to make this and other cute projects join my team. I promise you hours of unlimted crafting fun. 

Event details is listed on my calendar. 

Follow me on Facebook and Instagram!
  
Thank you for visiting my blog!
A blessed and happy crafter!
  

Happy crafting to you!

Tuesday, November 7, 2017

Stampin Up "Quilted Christmas"

Christmas Wishes featuring Quilted Christmas Designer Series Paper Images©Stampin' Up!

This month I'm in two different card swaps. The theme was Christmas, New Year's or Winter. I chose Christmas because I really love Stampin' Up's Christmas Quilt designer series paper. As you can see this this paper is part of the Quilted Christmas Suite. I really love how these cards turned out. You will notice a little color on the tips of each star, I achieved this effect by fussy cutting each star. 


Quilted Christmas  Suite  Images©Stampin' Up

Christmas Quilt Photopolymer Bundle    Quilted Christmas 6" x 6" (15.2 x 15.2 cm) Designer Series Paper

Christmas Wishes from across the miles!
Images©Stampin' Up

Images©Stampin' Up
        Card measurements: 4 1/4" x 5 1/2"

Supplies:
Christmas Quilt Bundle - 146026
Holly Berry Happiness Stamp Set - 142061
Quilted Christmas Designer Series Paper - 144617
Whisper White Cardstock - 100730
Real Red Cardstock - 102482
Garden Green Cardstock -102584
Real Red Ink Pad - 126949
Garden Green Ink Pad - 126973
Quilted Christmas Ribbon - 144620
Brights Enamel Shapes - 141680
Fast Fuse - 129026
Mini Glue Dots - 103683

Cutting:
Cut whisper card stock 8.5" x 5.5", score@ 4.25"
Cut garden green card stock 1" x 5.5"
Fussy cut stars from Quilted Christmas designer series paper (dsp)
Cut ribbon strip 5.5" long

Stamping and Assemble:
Stamp sentiment on bottom right hand corner of card base and stamp verse inside card. Attach cardstock strip to card base using fast fuse. Attach ribbon to cardstock strip using mini glue dots. Using fast fuse attach star to card stock and ribbon layer.  To give your star that extra pop add a bright enamel shape.

Extra:
I wanted to bring in more color so I added three star images using the stamp set from October 2017 Paper Pumpkin Kit, "Pining for Plaid". I really love how those stars made everything on the card tie together.  As you can see this is a quick and simple card. If you're not a big fan of fussy cutting you could always get the Quilt Builder Framelits Dies.


Follow me on Facebook and Instagram!


Thank you for visiting my blog!
A blessed and happy crafter!


Happy crafting to you!


ICS Blog Hop Fall Fun

  Hello and welcome to September ICS Blog Hop! This month's theme is "Fall Fun".  Stampin' Up has lots of great products t...