Showing posts with label heartfelt. Show all posts

Friday, October 6, 2017

Paper Pumpkin "A Season of Style"

Paper Pumpkin  "A Season of Style" Images©Stampin' Up!


PP_Coordinating_Kits_Demo_Head_0817

Everyone loves heartfelt and handcrafted holiday giving.  Which is why Paper Pumpkin designed match holiday kits for October and November!  Paper Pumpkin is offering two straight months of perfectly coordinated Christmas cardmaking and gifting projects. 

What does this mean for you?
 You will have everything to complete unique holiday cards and gifts.
You will have more creative options
You can get the handmade holiday touch without the fuss. 
 You could purchase for yourself or as a gift. 

Fine Details
Remember, the October and November kits coordinate but they also stand alone. You DO NOT need both kits to create a complete project.
To receive October’s kit, you must subscribe at paperpumpkin.com  by October 10.
To receive November’s kit, you must subscribe at paperpumpkin.com  by November 10.


For more information or any question please leave a comment.


Join Renee's Paper Pumpkin Patch


Thank you for visiting my blog.
Happy crafting to you!

Friday, September 29, 2017

Paper Pumpkin - September 2017 "Layering Leaves"

Paper Pumpkin - September 2017 "Layering Leaves" Images©Stampin' Up!


Some people live for autumn—the hay rides, the apple picking, the ripe fields and harvest moons—not to mention the pretty pumpkins on every windowsill and doorstep. To celebrate this splendid season, why not add to the beauty by making our stunning fall packages to give to a teacher, neighbor, coworker—maybe filled with spiced cider mix, roasted almonds, or pumpkin truffles? Just about anyone would love getting a package or card with layers of leaves and opulent hints of gold—handmade with love! 

And while these projects look super-fancy, don’t worry—they’re very easy to assemble. Watch the video for details, then don’t wait—start stamping!

Paper Pumpkin Supplies:
Layer Leaves Photopolymer Stamp Set
Cajun Craze Classic Stampin Spot
8 embossed pillow treat boxes
8  embossed card bases
8 painted envelopes
3 sheets die cut water colored wash leaf 
2 sheets gold foil leaf stickers
4 sheets of die cut leaves
10 clothes pins
Die cut Circle Tags
Die Cut Tags with gold foil
2/3 yard copper and white twine
Glue Dots
Dimensionals

 Additional Supplies:
Paper Snips and extra creativity

I really love how the kit comes with step by step instructions to create the kit on your own. 
I personally love to use the supplies to make alternatives. As you will see I completed 
one of the cards per the instructions and then I used some of the materials and 
made a super cute alternative.


There's still time to get the refills for this kit. Become a subscriber by October 10th and you will gain access to all past kits and refills while supplies last. 

Thank you for visiting my page!

Happy crafting to you!


Monday, September 18, 2017

Stampin' Up "Birthday Delivery" Birthday Card

Happy Birthday 

Images©Stampin' Up

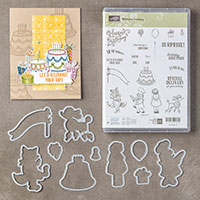
The inspiration to create these two cute birthday cards came from our team's sketch challenge. Every two weeks we're giving a new sketch to inspire and help us create. This inspiration comes from sketch number 5.  I chose to feature Stampin' Up's "Birthday Delivery" Stamp set. I really like how you're able to create custom designer paper with some of the stamps.  This stamp set comes in a bundle but for this project I only used the stamp set. 

Birthday Delivery Photopolymer Bundle
Images©Stampin' Up

Card Measurements: 4.25" x 5.5"

Supplies:
Birthday Delivery Stamp Set 143360
Whisper White Cardstock 101650
Sweet Sugarplum Cardstock 141418
Pacific Point Cardstock 111350
Berry Burst Cardstock 144243
Lemon Lime Twist Cardstock 144245
Sweet Sugarplum Ink Pad 141395
Pacific Point Ink Pad 126951
Berry Burst Ink Pad 144083
Lemon Lime Twist Ink Pad 144086
Pumpkin Pie Ink Pad 126945
Daffodil Delight Ink Pad 126944
Layering Square Framelits Dies 141708
Sparkle Embossing Folder 141468
Bigshot Die Cutting Machine 143263
Brights Enamel Shapes 141680
Fast Fuse 129026
Dimensionals  104430


Cutting 
Card base: Whisper White 8.5 " x 5.5", score@4.25" (2)
Whisper White Cardstock  4" x 6" (2)
Pacific Point Cardstock 4" x 6"
Sweet Sugarplum Cardstock 4" x 6"
Berry Burst Card Stock 4" x 6"
Lemon Lime Twist Cardstock 4" x 6"

Stamping, embossing and die-cutting:
Create custom designer series paper using the Birthday Delivery stamp set on one piece of whisper white cardstock. On the other piece stamp the sentiment. Using the 3" scalloped square die and cut the berry burst burst and lemon lime twist cardstock. Stamp sentiment  on the other piece of whisper white cardstock and use the 2 7/8" square die to cut out. To give sentiment layer an extra pop stamp birthday present image. Use Sparkle embossing folder on the Pacific Point and Sweet Sugarplum cardstock.

Assemble:
Use the fast fuse adhesive to attach the embossed cardstock  to the card base. Use adhesive to layer designer series paper according to the picture. Use adhesive to attach sentiment square to scalloped die cut square.  Using dimensionals to attach the sentiment layer to card base. Add six enamels shapes (3 on top & 3 on the bottom).  This will give the card that extra bling! Woohoo another cute project completed.


 Wouldn't you love to give someone this handmade, heartfelt birthday card. 
Join my team and let me share with you how to make this cute card!


Thank you for visiting my blog!
Happy crafting to you!


July 2026 PPP Hooray for Birthdays

Welcome to the Paper Pumpkin Possibilities Blog Hop! We are all fans of this monthly crafting kit and want to share with you our enthusiasm ...